Comparing turn performance.
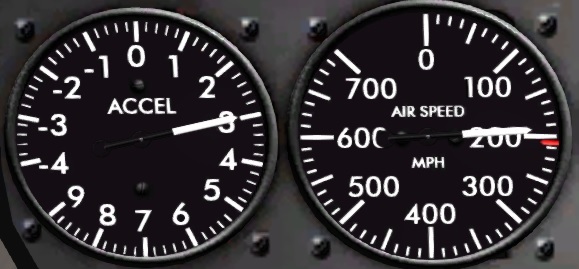
When we consider turn performance in air combat we often compare turn rates and turn radius between aircraft. Unfortunately we don't have turn rate or radius gauges in our cockpit. Instead we have our speedometer and accelerometer to define our turns. The speedometer gives us our indicated airspeed, we use indicated airspeed to allow for air pressure differences, and the accelerometer tells us how much radial g we are creating with lift. For a given indicated speed, say 200mph, the higher g load is the better turn rate and smaller radius. For a given load factor, say 3g, the lower speed is the better turn rate and smaller radius. So 3g is a better turn at 200mph than 2g, and 3g is a better turn at 150mph than at 200 mph.
Turns may be sustained or instantaneous.
A sustained turn is a balance of lift, drag, and thrust which results in a particular speed and load factor. As lift changes so does drag and speed, as speed changes the maximum available g load also changes. This is why a hard turn will slow you down and once you're slow you can't turn as hard. The combination of speed and g that gives the best sustained turn is generally the slowest speed where the max g is 2.7-3g, depending on aircraft model and weight. This is known as your best sustained turn.
Instantaneous turns refer to the highest g you can pull at your current speed. Because of the drag created by the increased lift the instantaneous turn is not sustainable unless you trade altitude for enough speed to overcome the extra drag.
The slowest speed that allows the highest safe load factor is called corner speed. This is your best rate and smallest radius turn. In Aces High we black out at 6g so we consider the tunnel vision preceding blackout to indicate our best high speed turn and the slowest speed we can pull to tunnel vision is our corner speed.
Turning near the stall.
Increasing AOA, the angle of attack that the moving wing meets the air, increases lift up to a point. That point is called the critical AOA. Increasing lift beyond the critical AOA creates a sharp increase in drag along with a decrease in lift. As AOA increases a few degrees past critical the airflow separates from the wing and lift is lost.
Because speed affects available g we want to avoid extra drag when maximizing our turns but we want max lift. Aces High gives us a stall warning horn a few degrees prior to the critical AOA. When airflow separation occurs on any part of the wing Aces High gives us a stall buffet indication with the cockpit shaking and a stall buffet sound. This lets us know when we are close to max lift, we hear the stall horn, and when we are turning too hard, we have buffeting.
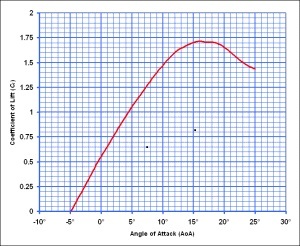
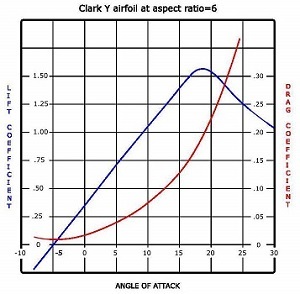
The AOA/Lift graph shows coefficient of lift changing with AOA for a typical AH airfoil. The critical AOA at CLmax is at 16 degrees in this graph.
The lift/drag graph, from a different airfoil, shows how drag increases beyond the critical AOA while lift peaks then reduces.
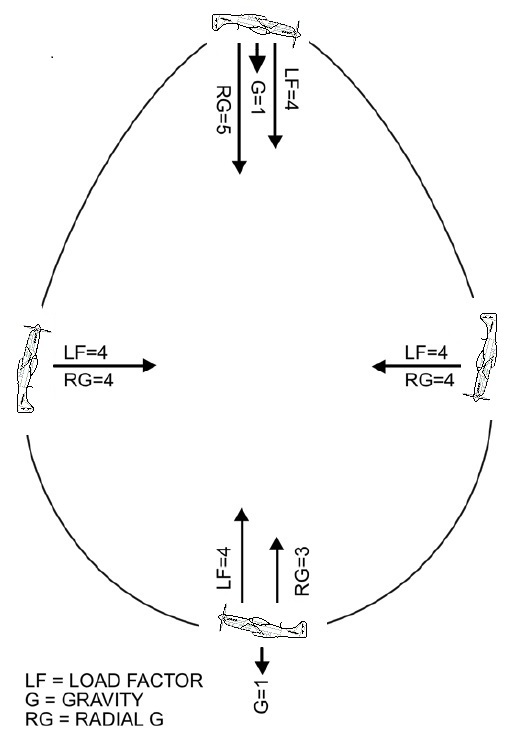
The energy egg shows the effect of gravity on vertical maneuvering. Radial g and load factor are the same in the pure vertical but gravity increases the load factor 1g at the bottom of the loop and reduces the load factor 1g at the top of the loop. This means your best vertical turn typically occurs when inverted at the top of the loop.
by MurdrTo the beginner or novice, statements regarding E (energy) can at times seem abstract and mystical. However, these concepts are rooted in some basic fundamentals of physics and are prerequisite to tactical deployment of Air Combat Maneuvers (ACM). In fact, your choices of ACM are limited only by your airframe's abilities and your state of E. There are two types of energy. Kinetic energy is the energy you have now - your speed. Potential energy is the energy you have "in the bank" - your altitude. By diving, you can cash in some of your altitude (potential energy) and convert it to speed (kinetic energy). "E" refers to the total kinetic, and potential energy you have available to you at any given moment. The potential problem here should be obvious - just like money in your bank, once you withdraw and spend it all, you are broke. Use up all your alt and your potential energy bank account dries up. All you have left is the money in your pocket - your speed. Use that up too, and you are left low and slow with nowhere to go. Well, not exactly true - you can probably find a free ticket back to the tower without searching very hard. The two energy states are interchangeable, and a common rule of dogfighting is to always exchange one for the other. Use your speed to gain alt - use your alt to gain speed. By converting one to the other, you minimize how much E you lose overall. Just like the money in your bank, once you spend your E, it is gone! It is also important to note that because the two types of energy ARE interchangeable, a lower, fast plane and a higher, slower plane may have equal E. Think about it a second. If the low plane converts it's kinetic energy into potential energy by climbing, it may well end up the same altitude and speed as the plane above it. Similarly, the high, slow plane can convert it's potential energy into kinetic energy by diving and matching the speed and alt of the lower plane. By the way - how often do you hear a pilot chiding another pilot for losing a "co-alt" fight? If one plane is 350 mph and the other is 250 mph, does being co-alt mean much? Notice the victor never says "Co-E"? Offsetting your two forms of energy are two energy-draining forces: aero-resistance and gravity. Aero-resistance, or drag is caused by the friction of the air you displace; the harder you turn the more air you displace. The resulting loss of energy is referred to as "bleeding". Similarly, if you dive to build speed, then maintain level flight, you slowly lose speed as friction causes drag on your plane. Gravity is pretty obvious - the Earth wants you to come down! While you can not control the force of gravity, you CAN manipulate drag. By refraining from hard turns unless absolutely needed and by eliminating extended periods of level flight after a dive, you can minimize your loss of E to drag. Let's apply all this theory to a practical situation. You are faced with a near co-E enemy plane of similar capabilities, and you must turn after the merge. A common mistake of new pilots it to make a horizontal turn. When you make a horizontal turn, you bleed speed (kinetic energy) away as you fight drag and gravity, which in turn allows you to turn a tighter radius. The disadvantage to this approach is that the energy you have bled is gone for good. You have failed to convert your kinetic energy to potential energy by trading speed for alt. However, if you examine the forces involved in a vertical turn ( 1/2 loop up, called an Immelman), you will see that you bleed speed away faster because the effects of gravity are increased. The reduction in speed (kinetic energy) allows your airframe to reach its optimum turn rate even faster than a horizontal turn. At this point, you might be thinking, "But wait, aren't we trying to CONSERVE energy?" Yes, you are - and you have! By using a vertical turn, you have converted some of your kinetic energy into potential energy - you now have more alt! You are higher and slower - which tightens your turn radius - and setup to convert your potential energy back into kinetic energy as you dive on your opponent below you. If he made a horizontal turn, you have gone from a co-E state to a position where you now have an E advantage! While he was recklessly throwing away his E in a horizontal turn, you wisely banked some of your energy and are rewarded by gaining the upper hand in the fight. Understanding the way alt transfers to speed, speed transfer into alt, and the energy draining forces of drag and gravity is important to successful flying in Aces High. Proper management of E is a must in air combat. Not only will your choice of maneuvers will be limited by your E state, but also your ability to choose to engage on your terms. The plane with the most energy in a fight is the one with the most choices. When you see a course talk about E, remember: Kinetic energy = speed. Potential energy = alt. You should strive to trade alt for speed and speed for alt. Working against you are the forces of drag and gravity. A constant underlying goal of every fight is to minimize the forces working against E while maximizing your transition of kinetic energy to potential energy and vice versa. One final note regarding E management. Choosing to "dump" or shed energy is also a form of energy management. There are Air Combat techniques to use an opponents Energy against them (think of it as the ju jit zu form of ACM). While we do want to as a general rule try to conserve our E state, there may be times we need to dump E when in close combat. The most obvious example would be a faster plane on the six of a slower plane. If you are the faster plane, you need to keep some separation from the plane in front of you to prevent overshooting in front of them. If you have a great E advantage, you might just pull up into the vertical, extend, and re- engage at your leisure. However if your E advantage is too small to allow that choice, another method would be to "dump" E by throttling down, and using your control surfaces to create extra drag, with the goal of making the situation where you are co-speed. When the situation that caused you to dump E is under control, it is wise to right back to banking your E as soon as possible in preparation for your next engagement. Learning to apply the concepts of Energy Management in the arenas will not guarantee you will win your fights - but it WILL help give you positional and E-state advantages which will make winning your fights easier. |
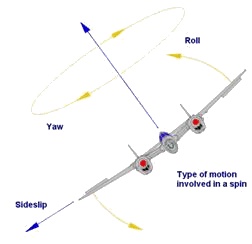
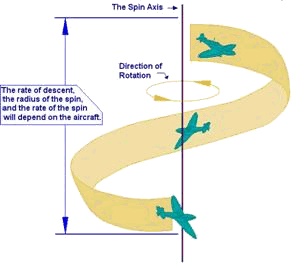
TCWhat Is A Spin? Well a spin is by definition an un-commanded and stabled flight condition combining roll, yaw and sideslip. In Aces High this condition persists once a pilot has pushed his plane into the stall buffet or beyond the low speed end of the flight envelope. Most times you will find this situation caused by improper control input by the pilot. When a plane enters a stall, the plane will normally begin to roll to one side. There are two main reasons for this. When the plane enters the stall, the torque of the engine may start to roll the plane in the opposite direction of the prop's rotation. This is possible because the wing lift is no longer providing the steadying influence that keeps the engine torque under control. The second reason is that one wing may lose lift before the other. This causes the wing that still has lift to start the plane rolling because the plane has lost lift of the other wing. End result throwing the aircraft into a spin.
To recover from a spin, the pilot must reduce throttle, and push forward on the stick to get the aircraft in a nose down attitude then apply rudder opposite from the direction of spin rotation. Once the spin slows down and comes to a stop, increase throttle and slowly pull out to level flight when the aircraft is back under control, if you over correct or pull out to soon you may find your aircraft will enter into another spin more abruptly. This is the reason to be gentle and cautious on the first attempt. Inverted spin recovery can be a little more challenging but is possible. On the flat spin / horizontal spin you will find the most challenging and sometimes if not most almost impossible to recover from. |
Select an option from below to reveal information about advanced flight concepts in Aces High.
by Hammer
|
Flight Instruction
Courtesy of Zeno's Warbird Videos
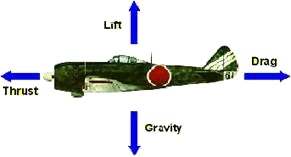 Your plane has four basic forces working on it during flight –Thrust, Gravity,
Drag, and Lift.
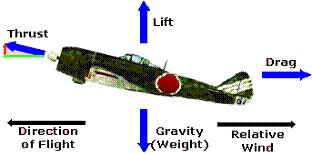
 Besides giving a vertical component to thrust, lifting the nose of the plane
increases the Angle of Attack of the wing which increases the lift produced by
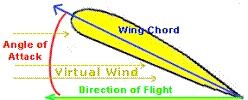
the wing. The Angle of Attack is the angle at which the chord of the wing meets
the relative wind. The chord is the line between the leading edge and the
trailing edge of the wing. As mentioned above, the relative wind is opposite
your direction of flight and equal in force to your indicated air speed.
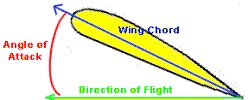 As
an aircraft’s speed decreases, Lift decreases unless the Angle of Attack is
increased. The Angle of Attack can be increased until the wing reaches its
“critical angle”. This is the Angle of Attack at which airflow over the wing is
disrupted to the point that lift is no longer produced. At this point, the wing
stalls. The critical angle varies with speed, weight of the plane, and wing
design. The Angle of Attack is increased by using the elevator to increase the
pitch of the aircraft.
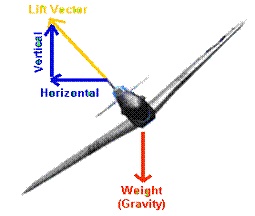 Lift
vector is the force vector you will discuss the most when talking about
maneuvers. That is because almost all maneuvers are done by manipulating your
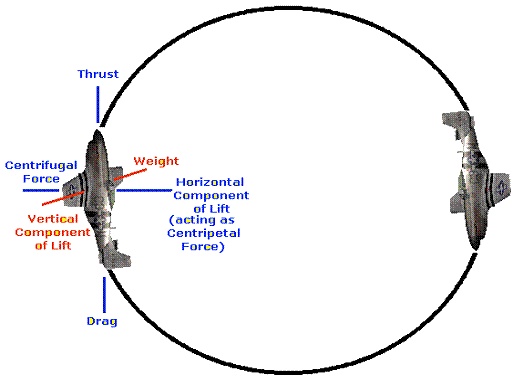
lift vector and increasing the wing’s Angle of Attack. To turn your plane, you
first roll your wings so the lift vector is pointed towards the direction you
want to go as in the picture to the right.