by Hammer
Open this page as a PDF formatted for printing
Level bombing in Aces High II is not rocket science, but it does require some
planning, patience, and an understanding of the systems used in order to be
successful. The purpose of this write up is to shed some light on techniques
that can make you a successful level bomber. These are certainly not the only or
even the best methods to accomplish your level bombing mission, but they do work
for me!
Choose Your Target
The first step in planning a bomber mission is to choose your target
and which structures you wish to destroy at your target. You will use your
situation awareness and your own personal goals to decide where you can
successfully bomb and where you can help influence the battle. The most common
targets are the airfield your country is trying to capture or the airfield that
is attacking your airfield. Other popular targets include vehicle bases and an
enemy’s HQ. With an effective strat system, factories and cities could also
become popular targets.
Once you've decided on your target, you must figure out
how much ordnance it is going to take to destroy it. The chart below shows the various structures,
what it takes to destroy them, how long they are down, and what effect their
destruction has. Note the down times listed are the maximum down times if the
base is not re-supplied. Drone supply convoys are constantly running and the
enemy can re-supply a field from nearby bases so, with the exception of hangars
and CVs, you will rarely see items down as long as indicated in the chart.
| Target type |
Target |
Destroy with |
Downtime |
Effect |
Supplier |
Can be
resupplied |
| Field |
Map room |
10 troops |
N/A |
Captures field |
N/A |
No |
| Guns |
1 100 lb |
2 hours |
Kills field ack |
AAA factory |
Yes |
| Radar |
1 250 lb |
2 hours |
Kills field radar in a 12.5 mile radius |
Radar factory |
Yes |
| Ammo |
1 250 lb |
2 hours |
Reduces bomb/rocket
loadout to zero |
Ammo factory |
Yes |
| Fuel |
1 250 lb |
2 hours |
Reduces maximum
allowed fuel load |
Fuel refinery |
Yes |
| Barracks |
1 250 lb |
2 hours |
Reduces troop loadout
to zero |
Training facility |
Yes |
| Fighter hangar |
3 1000 lb |
15 mins |
Disables fighters at
the field |
N/A |
No |
| Bomber hangar |
3 1000 lb |
15 mins |
Disables bombers at
the field |
N/A |
No |
| Vehicle hangar |
3 1000 lb |
15 mins |
Disables vehicles at
the field |
N/A |
No |
| Shore battery |
4 1000 lb |
15 mins |
Disables shore battery at the field |
N/A |
No |
| Town building |
1 250 lb |
45 mins |
Kills town building to
allow for field capture |
N/A |
No |
| Zone |
HQ |
37 1000 lb |
2 hours |
Kills all radar for a
country |
City building |
Yes |
| AAA factory |
1 250 lb |
3 hours |
Loads supplies for
field guns |
City building |
Yes |
| Radar factory |
1 250 lb |
3 hours |
Loads supplies for
field radar |
City building |
Yes |
| Ammo factory |
1 250 lb |
3 hours |
Loads supplies for
ammo at fields |
City building |
Yes |
| Fuel refinery |
1 250 lb |
3 hours |
Loads supplies for
fuel tanks at fields |
City building |
Yes |
| Training facility |
1 250 lb |
3 hours |
Loads supplies for
barracks at fields |
City building |
Yes |
| City |
City building |
1 250 lb |
3 hours |
Loads supplies for
factories and HQ |
City building |
Yes * |
| Supply |
Train |
1 100 lb |
N/A |
Stops train from
resupplying destination |
N/A |
N/A |
| Convoy |
½ 100 lb |
N/A |
Stops convoy from resupplying destination |
N/A |
N/A |
| Barge |
½ 100 lb |
N/A |
Stops barge from
resupplying destination |
N/A |
N/A |
| Ships |
Primary ship |
8 1000 lb |
10 min |
Sinks task group,
respawns at port |
N/A |
No |
| Other ships |
2 1000 lb |
1 hour |
Sinks ship |
N/A |
No |
| Special Types |
Barrier |
N/A |
N/A |
Barrier |
N/A |
N/A |
| Structure |
1 250 lb |
45 minutes |
An object any country can destroy |
N/A |
No |
These values are subject to change
Select Your Bomber and Bomb Load
Choosing which bomber to use for your mission is a matter of personal preference
and what you hope to accomplish with your mission. If you want to destroy all of
a certain type of target, you need to choose a plane that will allow you to
carry enough bombs to do so. The number of bombs you will require to destroy a
target will vary widely with experience and I won't try to give any guidelines
other than to say practice and determine the minimum number of bombs you need to
drop and the maximum number of targets you can destroy. Experiment with
different bomb loads and remember that a formation allows you to accomplish
missions with different bombs or salvo settings than you could with a single
plane. If you are unsure what targets are going to be up at your target, 500
pound bombs are a flexible choice.
Select your bomber and bomb load in the hangar. Below is a quick summary of the
level bombers, ordered by bomb load:
Lancaster III - Capable of carrying a whopping 14,000 pounds of bombs, the
Lancaster is slow, climbs poorly, and has fairly weak defensive armament. Use
for very high altitude bombing or in areas where your fighters own the sky. If
you're going up high, plan on a long flight. It takes a Lanc over 35 minutes to
reach 25k with 14k bombs and 25% fuel (see chart below).
B-24J - The B-24J and the B-17G share the strongest defensive armament of all
the bombers and have similar performance but, with the B-24 carrying 2,000
pounds of bombs more than the B-17 (for a total of 8,000 pounds), the B-24 instantly
surpassed the B-17 in popularity when it was introduced with version 2.01.
Unlike its use in the real world, the B-24J is more often used in Aces High for low
altitude tactical strikes than high altitude bombing.
Ju 88A-4 - It is probably a surprise to most people that the Ju 88 can carry
a heavier bomb load than the B-17, but numbers don't lie. Capable of carrying 4 x 500kg
bombs externally and another 20 x 50kg bombs internally, the Ju 88 can carry
3000kg (6,600 pounds) of ordnance, including 2 torpedoes. While it is faster
than the B-17 below 20k, it has a lower rate of climb and much weaker defensive
armament. Still, it has enough bombs to destroy a hangar or two with plenty left
over to de-ack a field and then go to work on the fuel and ammo. If only it had
a forward firing 20mm instead of the puny 7.7mm!
B-17G - The B-17G, along with the B-24J, has the strongest defensive armament of
all the bombers and can carry a respectable 6,000 pounds of bombs. It is also
fairly fast (for a bomber), especially up high. Like the other level bombers,
you are as likely to see B-17s on the deck as up high.
B-26B - The Marauder is a great bomber for rendering a field useless. Capable of
carrying 4000 pounds of bombs, it can carry large bombs to destroy hangars or
small bombs to destroy the ack, fuel and ammo. It has fixed, pilot controlled
forward firing guns that allow lots of strafing. It is about 50 mph faster than
a B-17 down low, making it a good choice for low altitude missions. Its main
weakness is the lack of a belly gun, allowing undefended attacks from
underneath. Keep it below 2,000 feet and that is not much of a problem (but the
swarming enemy are!).
Ar 234B - The only perk bomber currently in the game, the Arado Ar 234B is a jet
powered bomber capable of carrying 1500kg (3,300 pounds) of bombs. Faster than
most fighters at any altitude, the Arado is not immune to the fighter diving
down from higher and for that reason should be flown at least at medium altitude
where it will have a chance to dive away from an attacker. To fly at high
altitude, you will probably have to sacrifice 1,000kg of bombs in order to take
drop tanks needed to give you the range.
TBM-3 - The only carrier based bomber capable of level bombing, the TBM can
carry a torpedo or up to 2,000 pounds of bombs. It can also carry 6 wing mounted
5 inch High Velocity Aerial Rockets (HVAR) which gives it enough firepower to
take out a hangar. However, since carrier launched fighters such as the F6F and
F4U-1D can carry just as much ordinance, the TBM has a hard time making a place
for itself in the arena and is usually flown as a novelty or for a torpedo
attempt against an opposing fleet.
Boston III - Introduced with Aces High version 1.10, the Boston III is an older
cousin of the A-20G Havoc (also introduced in 1.10). The best performing level
bomber, it is capable of carrying only 2,000 pounds of bombs and has very weak
defensive armament. Because many fighters can carry more ordnance than the
Boston III, this bomber will most likely find its use limited to scenarios.
Ki-67 - Introduced in version 1.09, the Ki-67 "Hiryu" (Flying Dragon) is the
first Japanese level bomber in the game. The Ki-67 is a fast bomber with a very
good rate of climb but it carries a maximum of only 800kg (1,760 pounds) of
bombs and lacks the pilot controlled guns of the B-26. It can carry a torpedo
but torpedo runs are fairly rare. For these reasons, I suspect it will have
difficulty finding a niche in the main arena. Still, its speed, climb rate, and
the 20mm cannon in its dorsal turret make it a good choice for a quick strike
bomber while its speed and climbing ability can allow it to survive high
altitude missions. This bomber can also be flown in the attack mode.
Formation or Single Sortie?
There is little reason to take only a single bomber instead of a formation
unless you plan on making a low level, nap-of-the-earth (NOE) run with lots of
hard maneuvering. Even then, if you can get a formation to the target, you have
3 times the destructive power available.
Decide Your Bombing Altitude and Calculate the Time/Distance to Get There
Your next step in planning your bomber mission is to decide what altitude you
want to be at over the target. You may also want to reach a certain altitude
before entering enemy territory. Deciding these issues will help determine where
to start your sortie and help you plan your route. Choosing an altitude to bomb
from is a compromise of three issues: how long it will take to get there, the
likelihood of being intercepted, and how accurate you are from altitude.
How long it will take you to get to a certain altitude is plane dependent. Below
is a chart showing how much time and distance it takes the various bombers to
get to altitude with the indicated fuel load and the maximum bomb load using the
default auto-speed. These measurements were taken in AH1. The AH2 performance
may be slightly different but the measurements are still close enough for
planning purposes.
The likelihood of interception decreases with altitude. In the main arena,
anything below 10k is low altitude. At these altitudes, the probability of
interception by enemy fighters is almost 50% unless your side has total air
superiority and the numbers to maintain it. Even then, you will probably need a
gunner over the target so you can concentrate on dropping your bombs. If there
is an even fight going on over your target, low altitude is probably not a good
choice.
From 10k up to about 20k is medium altitude. The risk of interception is still
high, but it will more than likely be by one or two planes at a time instead of
getting hoarded like you do at low altitude. The down side is it takes longer to
get to these altitudes and will possibly be above a wind layer, making your
bombsight calibration more difficult. If there is a hard-pressed even fight
going on over the enemy base, a medium altitude run has a decent chance of
making it. You will probably still need a gunner over the target, though.
High altitude is 20k and up. The higher you are, the less likely you are to be
intercepted. On the other hand, it can take some of the bombers a very long time
to get to altitude. For example, a B-17G with 6k bombs and 25% fuel takes almost
20 minutes and 2 sectors (50 miles) to climb from sea level to 20k.
Your accuracy at altitude will be a factor of practice. The more experienced you
are, the more accurately you can bomb from higher altitudes.
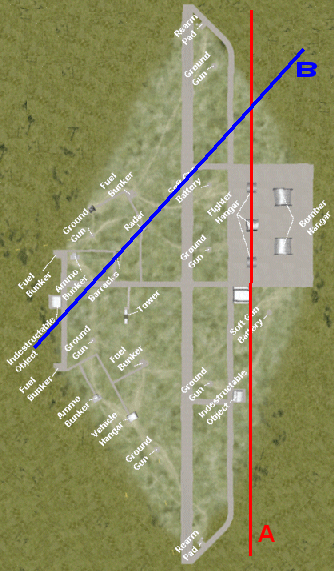 Choose Your Route Choose Your Route
Once you have figured out how much time and distance it will take to climb to
your desired altitude, you can decide how far back from the "front" you need to
take off in order to achieve your desired altitude. Once you have done this, you
have a start and end point for your route and you can figure out what comes in
between.
The first thing to consider in choosing your actual route is the direction from
which you want to approach the target. You do this based on what you want to hit
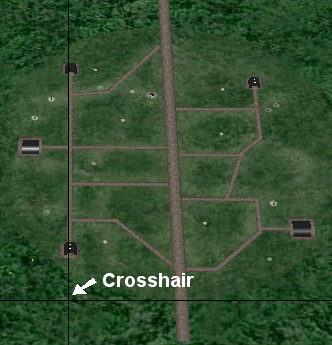
at the target. Look at the map of a small airfield to the right. If you want to
destroy the fighter hangars at this field, the approach indicated by line A is
appropriate. With good bombsight calibration and intelligent salvo settings, you
can destroy all the hangars in one pass. If, however, you want to destroy the
barracks and the radar, the approach indicated by line B would be appropriate.
If you don't drop all your bombs on the first pass, you also need to take your
next pass into consideration. Think about which way you should turn to help line
up the targets you want to hit on your second pass. Maps of the airfields are
available on the clipboard maps.
Now that you have determined where you need to start and how you want to come in
over the target for your bomb run, you need to plan your actual route. This is
often the most direct route if you are hitting a front line base, but you may
want to plan a more circuitous route that avoids the front line battles (which
are usually over or between airfields) if you want to hit a target farther back.
Plan to avoid enemy radar coverage (right click on your map and select "Radar"
to see the radar coverage around fields) if possible. The key is to select a
route that allows you to come over the target from the direction you have
planned for your bomb run. This could mean planning a route that brings you in
from that direction, or simply making the necessary adjustments as you approach
the target. You need to ensure you line up on your target early enough to allow
speed adjustments and bombsight calibration prior to the drop. You probably
won't want to drop at full speed and it takes longer than you might think to
stop decelerating and reach a stable speed. Plan on reaching your bombing
altitude at least 1/2 sector (preferably more) out from your target so your
speed has time to stabilize prior to calibrating your bombsight.
Taking Off
Taking off in a bomber takes a little more consideration than taking off in a
fighter. A bomber, especially the heavies like the B-17 and Lancaster, require
considerably more runway to takeoff and, once up, their climb rate is very low.
Make sure there are no hills at the end of the runway or you may find yourself
back in the tower much sooner than you expected.
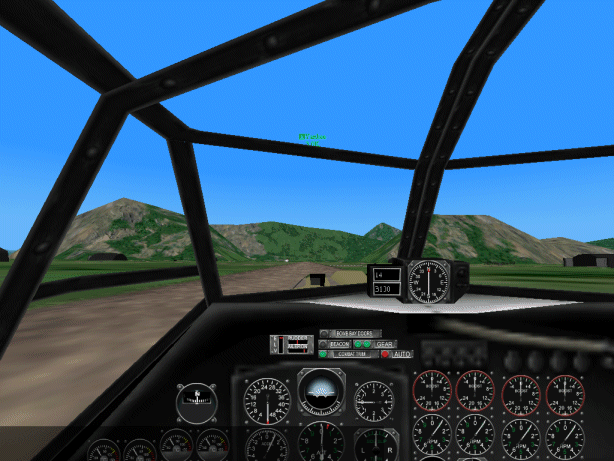
If your view down the runway looks like this, you might want to reconsider your
takeoff direction!
After starting your engines, apply throttle to start moving down the runway.
Just as in a fighter, apply rudder to keep yourself centered on the runway. If
you use auto-takeoff, you start on the runway with 2 notches of flaps down. Go
ahead and raise those back up. In doing some quick experiments with the B-17, I
have found you take off using less runway with flaps up. Once off the ground,
level to gain some speed while raising gear. Once you have reached your plane's
best climbing speed, apply auto-speed ([ALT][X]) and begin the slow climb to
target.
When taking off with formations, it is important to note that your drones will
not leave the runway to follow you on a "shortcut" takeoff path. You must
takeoff down the runway. Also keep in mind that your drones are trying to form
up with you and are susceptible to running into buildings at the airfield or
nearby terrain features if you maneuver them into them. Drones will not start to
form up on you until you are 200 feet above ground level (AGL). If you have a
drone lagging behind, chop throttle and allow it to catch up. If your drones get
too far away from your lead plane, they explode.
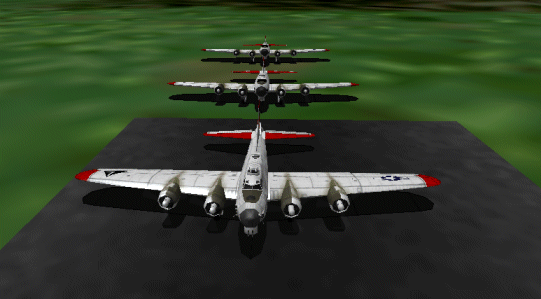
Take off down the runway if you want your formation to stay intact
Flying Your Formation to the Target
Flying in formation is a bit different from flying a single bomber. You must
make your turns gentle enough that your formation can stay with you. Too sharp a
turn and they will become separated. Separate too much and your drones will
self-destruct.
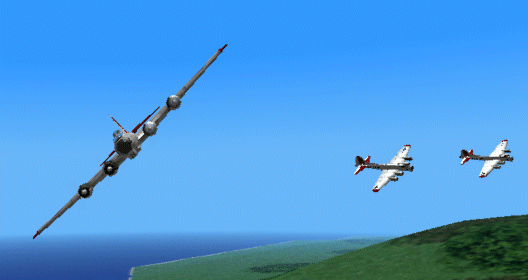
Turn too tight and you'll lose your formation
In addition to keeping your maneuvers gentle, it is a good idea to throttle back
during your turns. This allows the other planes to have the extra power they
might need to maintain formation.
As you are flying to your target, it is useful to pay close attention to your
text buffer for information about your target. You will often see reports about
fighter coverage, what needs to be hit, and who else is heading there with
bombs. If you are not seeing this information, you will want to ask about it so
you can plan your approach and bomb run. There is no need to start asking as
soon as you clear the runway, but once you are within a sector or so, you need
to know. The more details you can get the better, but don't expect everybody to
stop what they are doing to answer every question you may have about a target.
Take what you can get and plan accordingly. Adjust your approach to allow you to
hit as many targets as possible in one pass. Also, be prepared to change
targets. A lot can happen in the time it takes to get a bomber to a target!
Approaching the Target
It is important to get lined up with the target and into drop configuration
early enough to allow your speed to stabilize for proper bombsight calibration.
It can take a surprisingly long time for a plane to reach a stable speed when
reducing or increasing throttle. A good technique is to figure out an RPM
setting which gives you a constant speed and altitude. This RPM setting will
vary at different altitudes and by plane. Practice and experience will help you
determine what works best for you. It is even more important to get properly
lined up if you are bombing from above the wind layer(s) (if present) because,
once your bombsight is calibrated, any change in direction will throw the
calibration off in relation to the wind direction. This is discussed in more
detail during the bombsight calibration portion of this write-up.
Use the map to get lined up on your general direction of approach at least 12
miles (1/2 sector) from your target. Reduce your throttle to your drop setting
for a speed of somewhere between 150 and 185. Try to find a speed that will
allow your bomber to maintain altitude and not drift up or down. Open your bomb
bay doors so the drag will bring you to your actual drop speed. You will also
want to set your salvo and delay based on what structures you plan on hitting at
the target.
Your salvo setting determines how many bombs will drop when your press the bomb
key. The delay sets how much time elapses between each bomb. These are important
settings which allow you to spread your bombs over then entire target,
eliminating strats as you go, or concentrate them in one area to demolish a
hardened structure. Both salvo and delay are set using dot commands.
To set your salvo, the command is .salvo # where # is a number between 1 and the
max number of bombs you are carrying.
Delay is set with .delay #.## where #.## is a time between 0.05 seconds and 1.00
second. The difference between these is shown in the two pictures below.
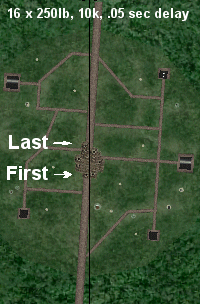 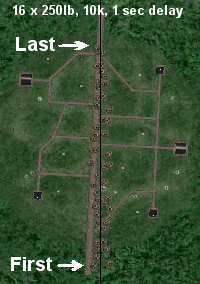
Formation Bomb Patterns, 10k, 175 mph IAS
If the skies are contested, you will probably want to call for a gunner before
you begin your final approach. While you can gun for yourself with no problem on
the way to your target, you can't effectively calibrate your bombsight, make the
bomb run, and gun for yourself while you're doing it. Give a call on your
country or squad channel and you'll more than likely find someone willing to
gun.
Final Approach
Once you have set your throttle, opened your bomb bay doors, and set your salvo
and delay, it is time to get in a position to make your final adjustments. Go to
the bombardier's position in your plane by pressing [F6].
When you enter the bombardier's position, you will be looking through the
bombsight. Take your cursor and align it on the vertical crosshair about 1/4 to
1/3 up from the bottom of your screen. You are going to use this to further help
you line up on the target. You may need to do a quick calibration to line up
your crosshair with your direction of travel.
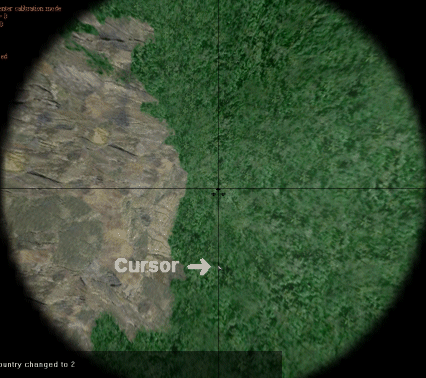
align your cursor with the vertical crosshair
After your cursor is aligned, push the [8] key on your keypad to look up from
your bombsight. You now have a reference to "dead center" from your bombardier's
view that can be used to further line up on your target once it is in view.
Adjust your view through the nose of the bomber to give as clear a view possible
out the nose. If you are in a TBM, you will have to go back to the pilot's
position.
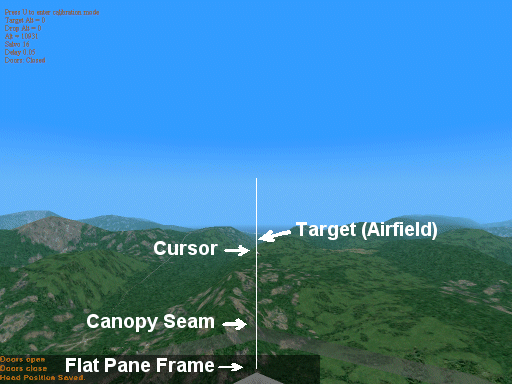
view from the bombardier's position in a B-17G - note how the cursor and other
available features
are used to line up with the target
Depending on your altitude and the terrain around it, you can spot your target
from as far as 10 miles away, maybe even further. Once you can see your target,
zoom in to see for yourself what structures are standing and make additional
adjustments to your approach direction to line up and prepare your bomb run to
hit the available targets.
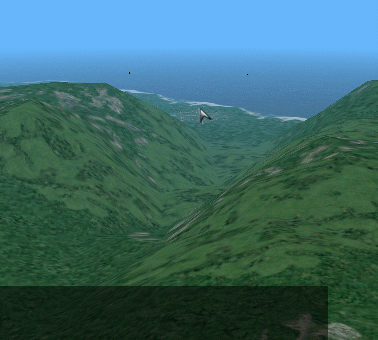
zoom in for a better view and more precise adjustments
While in the bombardier's position, to include while looking through the
bombsight, you can steer the plane using your joystick. When you release your
joystick, your plane will automatically go back to level flight. You want to
make gentle corrections and wait for the plane to stabilize to see the results.
While making your final adjustments, you should also be able to determine if the
structures you had planned on bombing are still standing or if you will need to
adjust your salvo and delay settings in order to effectively bomb other targets.
Once you have adjusted your flight path to your satisfaction, it is time to
calibrate your bombsight.
Calibrating Your Bombsight
Calibrating the sight is what gives most people trouble. In many flight
simulations, your bombsight is a laser pointer and your bombs hit where your
sight points. Not so in Aces High. Here you must calibrate your sight and fly at
the calibrated speed and altitude in order for your bombs to hit their target.
Before you calibrate your bombsight, you must be at a constant speed and
altitude. Use auto-level to set your altitude. Pick a speed at which your bomber
will fly without losing or gaining altitude and set your throttle to maintain
that speed. You can check your speed with the E6B on your clipboard. If your
speed is increasing or decreasing, you will not get an accurate calibration!
The steps involved in calibrating your bombsight are not that complicated. When
you enter the bombardier position by pressing the [F6] key, you are taken
directly to the bombsight view. This will give you a view like the one below.
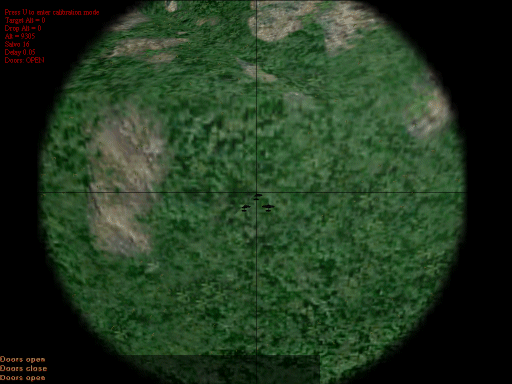
view through bombsight, no zoom
 The first thing you should notice is the red text in the upper left corner of
your screen. Red text indicates the sight is not calibrated. The first line of
this information will tell you to press [U] (or whatever key you may have mapped
it to) to enter the calibration mode. (If it says "Press None to enter
calibration mode", it means you must map a key to this function.) The bombsight
calibration functions are found in the "Flight" keys list of your keyboard
mapping. For the rest of this write up, I will use the [U] key as the key which
takes you into the calibration mode and the [Y] key as the key which is used to
calibrate speed during calibration. The first thing you should notice is the red text in the upper left corner of
your screen. Red text indicates the sight is not calibrated. The first line of
this information will tell you to press [U] (or whatever key you may have mapped
it to) to enter the calibration mode. (If it says "Press None to enter
calibration mode", it means you must map a key to this function.) The bombsight
calibration functions are found in the "Flight" keys list of your keyboard
mapping. For the rest of this write up, I will use the [U] key as the key which
takes you into the calibration mode and the [Y] key as the key which is used to
calibrate speed during calibration.
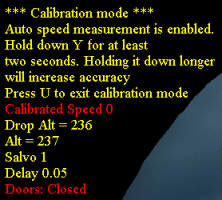 When you press the [U] key to enter the calibration mode, the text in the upper
left of your bombsight screen expands and changes color to yellow. Under the
heading ***Calibration mode***, the text states "Auto speed measurement is
enabled. Hold down Y for at least two seconds. Holding it longer will increase
accuracy". That is not the whole story, though! When you press the [U] key to enter the calibration mode, the text in the upper
left of your bombsight screen expands and changes color to yellow. Under the
heading ***Calibration mode***, the text states "Auto speed measurement is
enabled. Hold down Y for at least two seconds. Holding it longer will increase
accuracy". That is not the whole story, though!
Once your speed is steady, press the [Y] key and hold it. As the directions say,
hold at least 2 seconds but holding longer will increase accuracy. I recommend
10 - 15 seconds at least. The longer you hold it, the better the calibration.
Once you have held it for however long you want, release the [Y] key and press
[U] to exit the calibration mode. Once you do this, your bombsight text will
turn green, indicating you are calibrated.
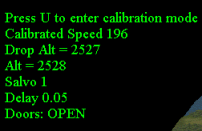 Once
your bombsight is calibrated, continue to watch your E6B to ensure you
remain at the calibrated speed as indicated on your bombsight. Also look at the
two altitude notations on your bombsight: the "Drop Alt" and "Alt". "Drop Alt"
is the calibrated altitude and "Alt" is your current altitude. These two
altitudes should be the same. If they are not, you are either gaining or losing
altitude. While one or two feet shouldn't make a difference, they should be the
same for your calibration to be 50% accurate. Once
your bombsight is calibrated, continue to watch your E6B to ensure you
remain at the calibrated speed as indicated on your bombsight. Also look at the
two altitude notations on your bombsight: the "Drop Alt" and "Alt". "Drop Alt"
is the calibrated altitude and "Alt" is your current altitude. These two
altitudes should be the same. If they are not, you are either gaining or losing
altitude. While one or two feet shouldn't make a difference, they should be the
same for your calibration to be 50% accurate.
You may calibrate as often as you like during a bomb run. If you have to
maneuver a bit to line up after calibration, it is usually worth the time to
recalibrate.
Bomb Run
If your approach to the target was lined up properly, you should be seeing it in
your sight soon. You want to acquire your target in the bombsight as soon as
possible and, once you acquire it, spend most of your bomb run looking through
your sight. Depending on your altitude, the type of target, and the terrain, you
can acquire your target from 10 miles or more away. That is almost 1/2 a sector.
If you still need to make adjustments to your line of approach, you can do so
but it can affect the accuracy of your calibration. If you have time, you can
recalibrate. If not, you have to decide whether to drop with your current
calibration or to go around again and try to make a better approach.
As you get closer to the target, it naturally moves closer to the center of your
bombsight. As soon as you have some distance between the top of your bombsight
and the target, you will want to zoom in by pressing [Z]. Usually, you are
zoomed in too far and will need to zoom out by pressing the [ key until you can
see your target. Once you have reacquired your target in the zoom mode, continue
to zoom in using the ] key, keeping your target just at the top of your sight.
As you get close to the target, you will have much more detail and you can pick
out the actual target you are going to drop on.
 > >
view through bombsight, maximum zoom
As you can see in the picture above, I am lined up to drop on two fighter
hangars. Since there are not targets in between the hangars, this would be a
place to use 2 salvos of only a few bombs. If you're not lined up to drop on
more than one target during your first pass, you will want to extend out far
enough to line up another pass. Usually, you need to keep going past the target
for a minute or two to have enough room to set up your next pass. If you turn
around too early, you will find your crosshair past the target. Remember, from
10,000 feet, the landing point of your bombs is well in front of the current
position of your plane. If you don't have enough bombs left to destroy a
particular type of structure on your second or third pass, adjust your salvo
setting and hit a smaller target such as an ack, fuel bunker, or city building.
Gunning
All of the bombers in Aces High are equipped with defensive guns. With the
exception of the Ar 234, these guns can be manned by you and 1 gunner. If you
man the guns yourself, your bomber will go on auto-level while you are away from
the pilot's position. You can, however, turn your bomber using your rudder.
To man the guns, simply press the number on your keyboard (not the keypad) that
corresponds to the gun you wish to go to, and you will be taken to that gun
unless that position is already occupied by a gunner. In formations, you have
the option of manning a gun position on the drone bombers as well as your own.
Press [CTRL] 1 for the lead plane, [CTRL] 2 for the plane on the left, and
[CTRL] 3 for the plane on the right. You will jump to the same gun position in
the designated plane. From there, use your joystick to control the gun. A chart
showing which number corresponds to which gun is below.
| |
Nose |
Tail |
Dorsal/
Upper |
Ball/
Ventral |
Left
Waist |
Right
Waist |
| Ar 234B |
- |
- |
- |
- |
- |
- |
| B-17G |
5 |
4 |
3 |
2 |
6 |
7 |
| B-24J |
5 |
4 |
3 |
2 |
6 |
7 |
| B-26B |
4 |
3 |
2 |
- |
5 |
6 |
| Boston III |
- |
- |
2 |
- |
- |
- |
| Ju 88A-4 |
- |
- |
2&3 |
4 |
- |
- |
| Ki-67 |
2 |
6 |
3 |
- |
4 |
5 |
| Lancaster |
2 |
4 |
3 |
- |
- |
- |
| TBM-3 |
- |
- |
2 |
3 |
- |
- |
You have 2 options when firing your defensive guns. Firing your primary guns (F
or joystick button 1) fires all guns which can hit the target. For example, if
you were manning the tail guns of a B-17 and had an enemy approaching from 6
o'clock and slightly high, pressing your primary trigger would cause the not
only the tail guns to fire at it, but also the upper turret. This usually brings
a lot more firepower to bear on the target. Pressing your secondary trigger (B
or joystick button 2) will fire only the guns you are manning. To return to the
pilot's seat from one of the gunner positions, press 1.
Gunning for yourself enroute to the target is usually no problem but you may
want to ask for a gunner as you approach the target. The reason for this is you
can't gun and make a bomb run at the same time. If you make the bomb run, you
are extremely vulnerable to enemy fighters. If you gun, you're not going to drop
any bombs. Many fighter pilots wait for a buff to get near the target, where the
pilot is probably in the bombardier's position, before making their attack.
Often, a call on the country or squad channel is all it takes to find a gunner.
Like your views from the cockpit, you can adjust the views for each gunner's
position and save them the way you want. See Aces High View System for more
details.
Returning Home
After successfully dropping your bombs on target, it is time to return home.
Generally, you will want to fly to the nearest friendly base that does not have
a furball over it. If you are at high altitude, avoid the temptation to drop
your altitude until you are sure you are safe from interception. It is better to
fly to your base and then spiral down. Sure, it takes more time but the chances
of a low fighter killing you on the way home are a lot less if you are way above
it!
Bombers are extremely easy to land. They are some of the most stable planes out
there and, with their huge wing areas, generally allow for very low speeds (well
below 100 mph with flaps) before stalling. The hardest part about landing a
bomber is getting slow enough that you can actually set down rather than float
right over the field. In general, you will want to put you gear down at 130 or
so and start lowering flaps. As your speed decreases, keep lowering flaps and
make sure that you continue to descend. Push the nose down a bit if you have to
and ride it in to a nice, smooth landing.
The Quicker Ride Home
If you're not interested in the long flight back to base, you might want to
consider going down low and using up some machine gun ammo on the base or any
enemy fighters that might be flying around. The B-26, with its fixed forward
firing machine guns, is especially well suited for strafing airfields. The B-17G
and B-24J with their ball turrets are also adept at hitting targets on the
ground with machine gun fire. You can do a significant amount of damage to a
field in this way, but you will often end your mission by being bounced by a
swarm of angry enemy fighters.
Regardless of how your mission ends, if you managed to put your bombs on target,
you can consider your mission accomplished!
| 
 Choose Your Route


 The first thing you should notice is the red text in the upper left corner of
your screen. Red text indicates the sight is not calibrated. The first line of
this information will tell you to press [U] (or whatever key you may have mapped
it to) to enter the calibration mode. (If it says "Press None to enter
calibration mode", it means you must map a key to this function.) The bombsight
calibration functions are found in the "Flight" keys list of your keyboard
mapping. For the rest of this write up, I will use the [U] key as the key which
takes you into the calibration mode and the [Y] key as the key which is used to
calibrate speed during calibration.
 When you press the [U] key to enter the calibration mode, the text in the upper
left of your bombsight screen expands and changes color to yellow. Under the
heading ***Calibration mode***, the text states "Auto speed measurement is
enabled. Hold down Y for at least two seconds. Holding it longer will increase
accuracy". That is not the whole story, though!
  Once
your bombsight is calibrated, continue to watch your E6B to ensure you
remain at the calibrated speed as indicated on your bombsight. Also look at the
two altitude notations on your bombsight: the "Drop Alt" and "Alt". "Drop Alt"
is the calibrated altitude and "Alt" is your current altitude. These two
altitudes should be the same. If they are not, you are either gaining or losing
altitude. While one or two feet shouldn't make a difference, they should be the
same for your calibration to be 50% accurate.
 >
>


